
When it comes to gardening I would first tell my students to begin with the easiest yet the trickiest, and one veggie that would just match perfectly is Tomatoes!!
Whether you’re a seasoned gardener or just dipping your toes into the soil for the first time, cultivating tomatoes can be an incredibly rewarding experience. From the satisfaction of nurturing a tiny seedling to the joy of harvesting plump, juicy fruits, there’s something truly magical about the process.
In this comprehensive guide, we’ll walk you through the essential lessons for achieving a bountiful tomato harvest right in your own backyard, even if space is limited. So grab your gardening gloves and let’s get started!
Seeding the Dream
Any gardening adventure begins with tiny seeds, bursting with potential.
For getting the best harvest selecting the right variety is crucial. I recommend starting with determinate (single harvest) or bush tomatoes for beginners. These are compact and easier to manage.
Tip: Look for organic seed suppliers who offer heirloom or open-pollinated varieties. These maintain their unique characteristics year after year, allowing you to save seeds for future plantings.
Also many online garden coaches recommend using seeds from tomato fruit directly, I would recommend to do so only and only if you know the fruit is from heirloom variety or local variety, high yielding varieties do not germinate and even if they germinate the growth and harvest will not be satisfactory, so better go to your local seeds store and buy seeds for the first time.
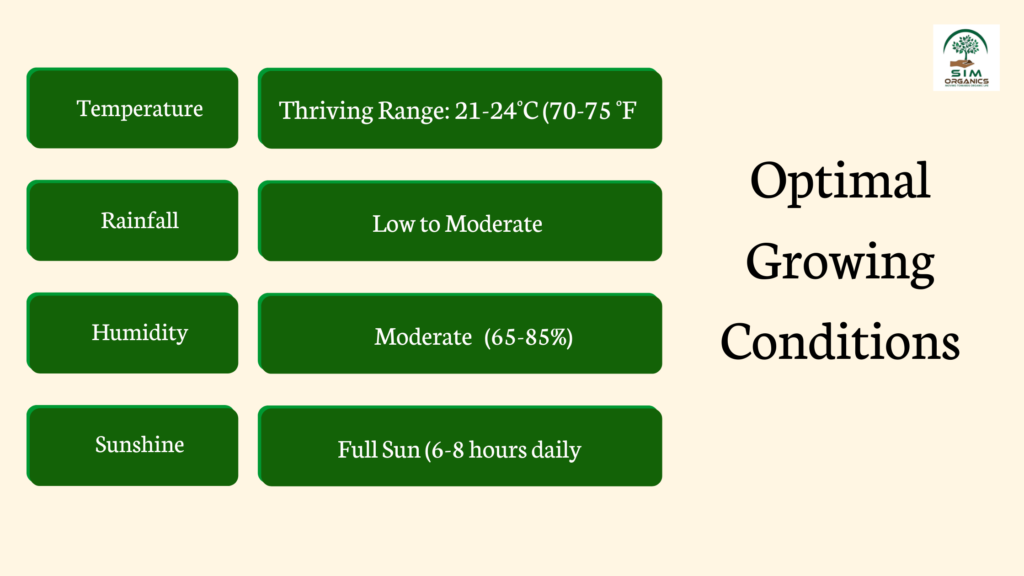
If you are a person who would like to make a not of the optimal conditions for tomato growing you should take into consideration the following:
| Factor | Thriving Range | Optimum Range | Sensitive To |
| Temperature (°C) | 10 – 30 | 21 – 24 | Below 10 & Above 32 |
| Temperature (°F) | 50 – 86 | 70 – 75 | Below 50 & Above 90 |
| Seed Germination (°C) | Min: 11, Max: 34, Ideal: 16-29 | Min: 52, Max: 93, Ideal: 61-84 | |
| Frost Tolerance | Not Tolerant | Avoid Planting During Frost | |
| Rainfall | Low to Moderate | Excessive Rainfall Not Ideal | |
| Humidity | Moderate (65-85%) | High Humidity Can Cause Disease | |
| Sunshine | Full Sun | 6-8 hours daily | |
| Additional Tips | Bright sunshine for vibrant fruit color | Avoid water stress during flowering/fruiting |
Creating A Thriving Nursery
The first thing you need to know is tomato is a sun-loving crop and so the seeds need to be placed somewhere where there is optimal sunlight so as to encourage germination.
Next, we need to provide the perfect environment for your seeds to germinate. Opt for organic, well-draining seed starting mix, you can buy our seed SIM starter soil mix which is filled with all the nutrients that is required for seed germination. Use Biodegradable pots that are eco-friendly and prevent transplant shock later.
Materials
- Tomato Seeds: Choose organic, open-pollinated seeds if possible.
- Seed Starting Mix: Opt for a well-draining, organic mix.
- Seedling Trays or Pots: Small containers with drainage holes. Biodegradable pots are a sustainable option.
- Water Spray Bottle
- Clear Plastic Wrap (Optional)
- Heat Mat (Optional)
Steps
- Moisten the Seed Starting Mix: Fill your containers with the mix and dampen it thoroughly. Don’t overwater, it should feel moist but not soggy.
- Planting the Seeds:
- Depth: Sow seeds about 1/4 inch (0.6 cm) deep.
- Spacing: Plant 2-3 seeds per cell/pot. You can thin them later if needed.
- Tip: Use a pencil or pen to make small indentations for the seeds.
- Covering the Seeds: Lightly sprinkle the seed starting mix over the planted seeds to cover them.
- Creating a Greenhouse Environment (Optional):
- Moisten a piece of plastic wrap and drape it loosely over the top of the containers.
- OR
- Place the containers on top of a heat mat set to around 70°F (21°C).
- Warmth and Light:
- Temperature: Maintain a warm location, ideally between 70-80°F (21-27°C).
- Light: Seeds don’t require light for germination initially.
- Moisture Management:
- Regularly mist the surface of the mix with water to keep it moist, but avoid overwatering.
- Lift the plastic wrap (if used) daily for a few minutes to allow for air circulation and prevent mold growth.
- Sprouting:
- Seeds should germinate within 5-10 days.
- Once you see sprouts, remove the plastic wrap (if used) and gradually introduce them to brighter light.
- Thinning Seedlings (Optional): After a few weeks, when seedlings have developed 2-3 sets of true leaves, choose the strongest one in each pot and gently remove the others using sharp scissors.
Additional Tips
- Label your containers: Note the variety and planting date for future reference.
- Gradual Light Acclimation: Once seedlings have sprouted, gradually introduce them to stronger sunlight over a week to prevent leggy growth.
- Fertilize: Once seedlings have several sets of true leaves, you can start using a diluted organic fertilizer suitable for seedlings.
By following these steps, you should be well on your way to successfully germinating your tomato seeds. Remember, adjusting the methods slightly based on your specific climate and available resources might be necessary.
Choosing The Right Variety

For the Indian condition some of the suitable varieties are
- Heirloom Tomatoes
- Prized for their unique flavor and historical significance.
- Examples: Lucknow Tomato, Desi Tomato (Naatu Tomato)
- Lucknow Tomato: Primarily cultivated in the northern Indian state of Uttar Pradesh, particularly around the city of Lucknow.
- Hybrid Tomatoes
- Bred for disease resistance, high yields, and extended shelf life.
- Examples: Arka Series (Arka Abhijit, Arka Ananya, etc.), Pusa Series (Pusa Ruby, Pusa Early Dwarf)
- Arka Series (Arka Abhijit, Arka Ananya, etc.): Developed by the Indian Institute of Vegetable Research (IIVR) and widely grown across various regions in India due to their adaptability.
- Pusa Series (Pusa Ruby, Pusa Early Dwarf): Another set of hybrids created by IIVR, popular in northern and central parts of India for their disease resistance and yield.
- Cherry Tomatoes
- Small, sweet, and perfect for snacking or salads.
- Examples: Pusa Cherry Tomato, Madanapalli Tomato
- Pusa Cherry Tomato: Developed by IIVR and well-suited for northern and central India.
- Roma VF (Roma Moldavica)
- Grown extensively in the southern states of India like Andhra Pradesh, Karnataka, and Tamil Nadu, owing to their suitability for processing. They are Plum-shaped tomatoes ideal for processing into sauces, paste, and ketchups.
- Minister (Naattu Mappillai)
- An open-pollinated variety traditionally cultivated in southern India, particularly in Tamil Nadu and Kerala. This variety is known for its meaty flesh and good disease resistance.
From Seedling to Superstar

Once your seedlings have sprouted a few sets of true leaves, it’s time to harden them off. Gradually introduce them to outdoor conditions for a week or two before transplanting. Let me share a detailed step by step process
Preparation
1. Harden Off Seedlings: A week or two before transplanting, gradually acclimate your seedlings to outdoor conditions. This helps them adjust to sunlight, wind, and temperature fluctuations. Take them outdoors for increasing durations, starting with a few hours in shaded areas and gradually increasing sun exposure.
2. Prepare the Planting Site: Choose a location that receives at least 6-8 hours of direct sunlight daily. The soil should be well-drained, fertile, and slightly acidic (around pH 6.0-6.8). Amend the soil with organic matter like compost or aged manure to improve drainage, fertility, and water retention. Consider a soil test to determine specific nutrient needs.
3. Dig Planting Holes: Space the planting holes according to the mature size of your tomato variety. Refer to the seed packet instructions for recommended spacing (typically 18-24 inches apart for indeterminate varieties and 24-36 inches for determinate varieties). Dig holes slightly deeper than the pots the seedlings are currently in.
Transplanting
1. Water Seedlings Thoroughly: Moisten the potting mix in the seedlings’ pots a few hours before transplanting. This makes them easier to remove and reduces transplant shock.
2. Gently Remove Seedlings: Avoid grabbing the stem; instead, use a spoon or your hand to gently loosen the potting mix around the base of the seedling. Carefully lift the seedling out of the pot, holding by the bottom leaves or root ball.
3. Plant at the Right Depth: Dig a hole deep enough to accommodate the entire root ball of the seedling. Ideally, bury the stem slightly up to the first set of true leaves (the larger leaves above the initial seed leaves). This encourages the development of additional roots along the buried stem.
4. Backfill and Firm Soil: Gently fill the planting hole with soil, ensuring there are no air pockets around the roots. Firm the soil gently around the base of the plant to provide good support.
5. Water Deeply: Water the transplanted seedlings thoroughly to soak the root zone. Avoid creating puddles around the base.
Aftercare
1. Mulch Around Plants: Apply a layer of organic mulch (straw, shredded leaves, etc.) around the base of the tomato plants to retain moisture, suppress weeds, and regulate soil temperature. Leave a few inches of space between the mulch and the plant stem.
2. Provide Support (Optional): For indeterminate tomato varieties that grow tall and sprawling, consider staking or caging them to provide support as the plants mature and produce fruit.
3. Watering: Water regularly, especially during hot and dry weather. Aim to soak the root zone without creating waterlogged conditions. Avoid frequent shallow watering.
4. Monitor and Address Needs: Keep an eye on your tomato plants for signs of pests, diseases, or nutrient deficiencies. Take necessary steps to address any problems promptly.
My Mantra: Healthy soil is the foundation of a thriving tomato plant. Amending your garden bed with compost, aged manure, and organic fertilizers rich in phosphorus and potassium provides the essential nutrients for strong growth and abundant fruit production.
Pruning
Pruning is very important in tomato plants.
Why Prune Tomatoes?
Pruning tomato plants offers several benefits:
- Improved Airflow: Enhances air circulation around leaves and fruits, reducing the risk of fungal diseases.
- Directed Growth: Focuses the plant’s energy on producing larger, healthier fruits on the main stem.
- Sturdier Plants: Reduces the weight on the main stem, preventing branches from breaking under the weight of fruits.
- Easier Management: Makes it easier to support tall plants, improves access for harvesting, and facilitates better monitoring for pests and diseases.
Types of Tomato Plants and Pruning
- Indeterminate Tomatoes: These varieties have continuous growth throughout the season and require more pruning.
- Suckering: Remove suckers that emerge between the main stem and branches. Pinch them off while they are young (around 3 inches) for easier removal.
- Topping (Optional): For very tall plants, you can pinch off the top growing tip after the plant reaches your desired height. This encourages lower branches to produce more flowers and fruits.
- Determinate Tomatoes: These varieties have a more compact, bushy growth habit and require less pruning.
- Suckering (Optional): You can remove suckers on determinate varieties, especially lower suckers, to improve airflow and fruit production. However, some gardeners choose to leave some suckers on determinate plants to increase yield.
General Pruning Tips
- Use Sharp Pruners: Sanitize your pruners with rubbing alcohol before pruning each plant to prevent spreading diseases.
- Prune Early Morning: Prune during the cooler morning hours to minimize stress on the plant.
- Make Clean Cuts: Make clean cuts at a 45-degree angle just above a leaf node.
- Don’t Over-Prune: Avoid removing too much foliage, as this can reduce fruit production.
Additional Tips
- For indeterminate varieties, some gardeners prefer to prune to one or two main stems for better management.
- Regularly monitor your tomato plants and adjust your pruning strategy based on their growth and your desired outcome.
Remember, pruning is not mandatory, but it’s a helpful technique to optimize plant health, fruit production, and overall manageability of your tomato plants.
Fertilizer Application for Nutrient Support
Tomatoes are heavy feeders, meaning they require plenty of nutrients to reach their full potential. Consider supplementing your soil with a balanced fertilizer high in nitrogen, phosphorus, and potassium to promote healthy growth and abundant fruiting. Remember to follow the manufacturer’s instructions carefully and avoid over-fertilizing, which can lead to nutrient imbalances and other problems down the line.
Common Tomato Deficiencies and Solutions

| Deficiency | Symptoms |
| Nitrogen (N) | Older leaves turn pale green, stunted growth, fewer flowers and fruits. |
| Phosphorus (P) | Purplish discoloration on undersides of older leaves, stunted growth. |
| Potassium (K) | Yellowing and scorching of leaf margins, weak stems, poor fruit development. |
| Calcium (Ca) | Blossom end rot (watery, sunken black spot on the blossom end of fruit), weak cell walls. |
| Magnesium (Mg) | Yellowing between the leaf veins on older leaves, progressing to the entire leaf. |
| Iron (Fe)(Uncommon in organic soils) | Interveinal chlorosis (yellowing) on new leaves, stunted growth. |
Common Tomato Pests and Diseases: Organic Solutions

| Pest/Disease | Symptoms | Organic Control Methods |
| Aphids (Small, soft-bodied insects that suck sap) | Yellowing leaves, curled foliage, stunted growth | * Introduce beneficial insects like ladybugs or lacewings. * Spray with insecticidal soap or neem oil solution. |
| Cutworms(Caterpillars that feed on stems at ground level) | Wilting or sudden death of seedlings | * Handpick and remove caterpillars at night. * Sprinkle diatomaceous earth around the base of plants. |
| Flea Beetles (Small jumping insects that leave holes in leaves) | Small holes throughout leaves | * Row covers can deter flea beetles. * Apply insecticidal soap spray. |
| Hornworms (Large green caterpillars with distinctive horn on the tail) | Large holes eaten in leaves and fruits | * Handpick and remove hornworms. * Encourage birds by providing nesting areas. |
| Early Blight (Fungal disease causing brown spots on leaves and stems) | Circular brown lesions with concentric rings on leaves and stems | * Practice crop rotation. * Water plants at the base to avoid wetting foliage. * Apply organic fungicide sprays like copper soap or neem oil solution. |
| Late Blight (Fungal disease causing rapid wilting and dark brown lesions on leaves and stems) | Watery brown lesions on leaves and stems, rapid wilting of the plant | * Purchase disease-resistant tomato varieties. * Remove and destroy infected plant parts. * Organic fungicide sprays like copper soap or neem oil solution can be helpful in early stages. |
| Blossom End Rot(Physiological disorder caused by calcium deficiency) | Watery, sunken black spot on the blossom end of the fruit | * Ensure adequate calcium in the soil by adding crushed eggshells or lime (in moderation). * Maintain consistent soil moisture. |
- Prevention is key: Maintaining good sanitation by removing plant debris and fallen fruits regularly helps reduce pest and disease problems.
- Organic amendments: Promote overall plant health and resilience through practices like composting and incorporating organic matter into the soil.
- Early intervention: Addressing pest and disease issues promptly is crucial to prevent them from spreading and causing significant damage.
- Seek local advice: Consult gardening experts or agricultural extension offices familiar with your region for specific recommendations and resources.
Harvesting and Storing Tomatoes: Knowing When to Pick and How to Keep Them Fresh
Harvesting
- Ripeness is Key: Tomatoes should be picked when they reach their peak ripeness for optimal flavor and texture.
- Visual Cues: Look for a vibrant and uniform color change according to the variety (red, yellow, orange, etc.).
- Gentle Touch: The fruit should yield slightly to a gentle touch but not be mushy.
- Harvesting Technique: Use sharp pruners or scissors to cut the stem just above the calyx (the green cap at the blossom end).
Stages of Ripeness
- Green: Not yet ripe, but suitable for picking if frost threatens. Can be ripened indoors.
- Breaker: Just beginning to show a hint of color change at the blossom end.
- Pink: Most of the fruit has turned the characteristic color, but the shoulder (area near the stem) may still be slightly green.
- Ripe: The entire fruit has reached its full color and yields slightly to the touch.
Storage
- Storage Temperature: Ideal temperature range for storing ripe tomatoes is 55-65°F (13-18°C). Avoid storing below 50°F (10°C) as it can affect flavor and texture.
- Sunlight: Not recommended. Store tomatoes in a cool, dark place.
- Refrigeration (Optional): Ripe tomatoes can be stored in the refrigerator for a short time (2-3 days) if needed. However, this can affect their taste and aroma.
Tips for Optimal Storage
- Store tomatoes individually: Avoid storing them close to other fruits or vegetables that emit ethylene gas, which can accelerate ripening.
- Countertop storage: For short-term storage (1-2 days), place ripe tomatoes stem-side down on a clean counter.
- Ripening green tomatoes: Place unripe tomatoes in a paper bag at room temperature. You can add an apple or banana to release ethylene gas and speed up ripening.
Additional Information:
- Homegrown tomatoes: Generally have a superior flavor compared to store-bought varieties and can be enjoyed at their peak ripeness.
- Different uses: Ripe tomatoes are perfect for salads, sandwiches, and various culinary creations. Green tomatoes can be used for making pickles or fried green tomatoes.
By following these guidelines, you can harvest your tomatoes at the perfect stage and store them properly to enjoy their deliciousness for a longer duration.
Are you looking for a lifestyle change for good health?
Sim Organics, a pioneer in its own right, is paving the way for nature lovers like you. We offer biofertilizers, organic garden essentials like premium soil mix, and can assist you in designing the perfect garden space to suit your unique needs.
For a consultation, contact us at +91 78801 66671 or email us at contact@simorganics.net.
Our solutions are also ideal for larger farmlands.